1. Confirm the posted file is PNG
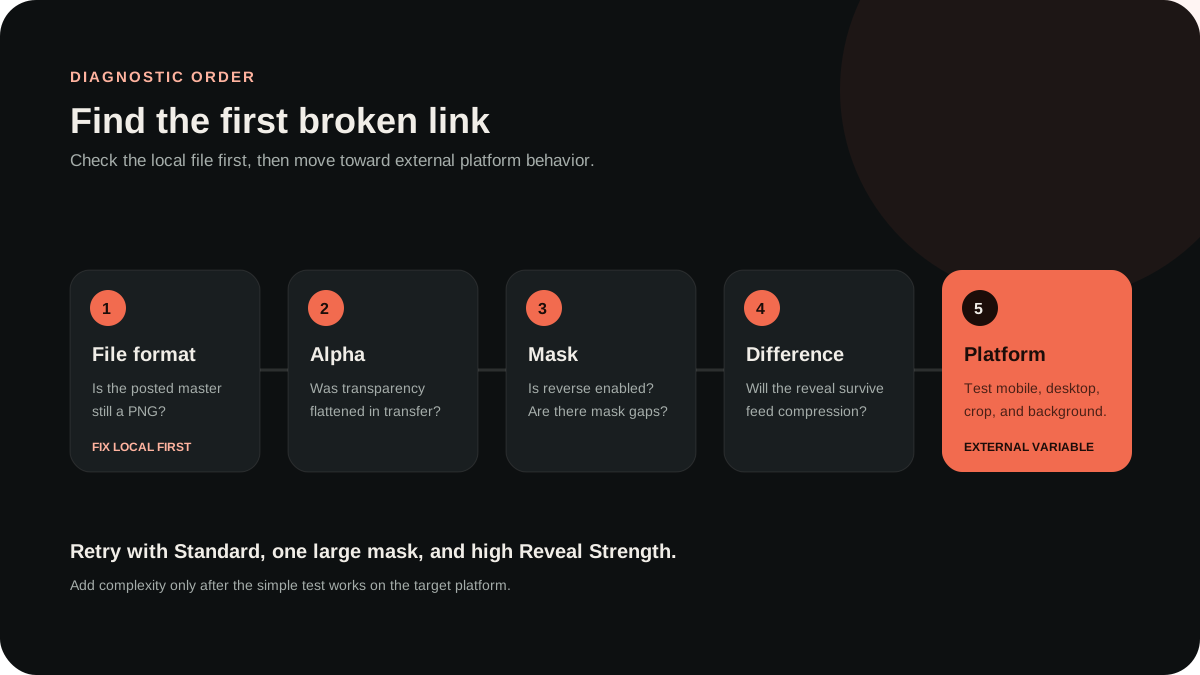
Start with the file extension and format because every later check depends on transparency still existing. RevealStudio downloads reveal-output.png. If the file became JPG or JPEG after editing, messaging, scheduling, or optimization, the alpha channel was removed and the reveal cannot behave as prepared.
Return to the original download and upload it directly when possible. If you need to move the file between devices, send it as an original document rather than a compressed photo. Re-export from the editor if you are unsure which version preserved transparency.
2. Check whether alpha was flattened
A file can keep a PNG name and still lose useful transparency if another tool placed it on a solid background. Open the image in a viewer that displays transparent pixels over a checkerboard or colored surface. The region you masked should not behave like an ordinary opaque rectangle.
If the background appears permanently filled, generate the result again and avoid the tool that flattened it. Image editors must export with transparency enabled. Social scheduling services and content pipelines should be tested separately because some optimize uploads before sending them to X.
3. Inspect the mask and reverse selection
Return to the editor and compare the red mask with the intended hidden region. Small gaps can keep important details visible, while an oversized mask can make the timeline state look empty. Use the eraser near faces, text, product edges, and other visual anchors that should remain readable.
Check the reverse setting. When reverse selection is enabled, unpainted pixels receive the transparency change. This is useful when only one small subject should stay visible, but it can look like a failure if enabled accidentally. Toggle it and compare both previews before generating again.
4. Make the difference survive compression
A technically valid PNG can still produce a weak reveal when the hidden detail is too small or too similar to the visible image. Increase Reveal Strength first. Then consider a larger mask, clearer edges, or more contrast between the first and second states. Avoid relying on tiny text, thin lines, or faint gradients.
Start from the Standard template to isolate the problem. Anime Reveal can protect colorful line work, Glow Reveal can emphasize bright effects, and Dark Reveal can help shadow-heavy sources. Adjust one parameter at a time and keep the change only when it improves the feed-size preview.
5. Check crop, size, and composition
X may crop or resize a preview differently across post layouts and devices. Keep the important visible subject away from extreme edges. If the payoff sits near a corner, reposition it in the source image before masking. The first state should remain understandable even when the image is shown smaller than expected.
Use broad shapes and a clear focal point. If the preview only works when zoomed in, simplify the composition. A reveal image is viewed first as a social thumbnail, so feed readability matters more than perfect detail at the original working resolution.
6. Compare mobile and desktop behavior
Platform backgrounds, expansion behavior, and image surfaces can differ between the X mobile app, mobile browser, and desktop site. A result that appears strong on one surface may look subtle on another. Check the devices that matter most to the intended audience.
Browser previews are planning tools and cannot reproduce every external rendering path. If platform behavior changed, keep the original source and mask concept, then rebuild with a stronger visible anchor and more conservative transparency. Do not assume a previous post guarantees identical future behavior.
7. Use a controlled retry sequence
For the fastest recovery, upload the original source again, choose Standard, paint one large meaningful region, use high Reveal Strength, and export directly to PNG. Post that simple version as a low-risk test. This removes most variables and confirms whether the basic platform effect is currently available.
Add complexity only after the simple test works. Refine the edge, restore the preferred template, and adjust contrast or saturation one control at a time. Keep each exported master so you can identify which change improved or broke the result instead of repeating the entire process blindly.
8. Set the right expectation
RevealStudio controls the local image preparation, not X compression or rendering. A correct PNG, intentional mask, and strong composition increase the chance of a clear result, but no tool can guarantee how every future platform version will display transparency.
For launches and important campaigns, keep a normal static image ready as a fallback and place essential information in the post text or landing page. The reveal should add interaction without becoming the only way a viewer can understand the message.