Help center

Tap and Hold Image FAQ

This FAQ covers the questions that appear between discovering a tap-and-hold image and publishing a reliable test on X. Start with the file format and alpha channel, then check the mask, parameters, composition, transfer method, and final platform preview.

Visual guide

Use the FAQ in diagnostic order

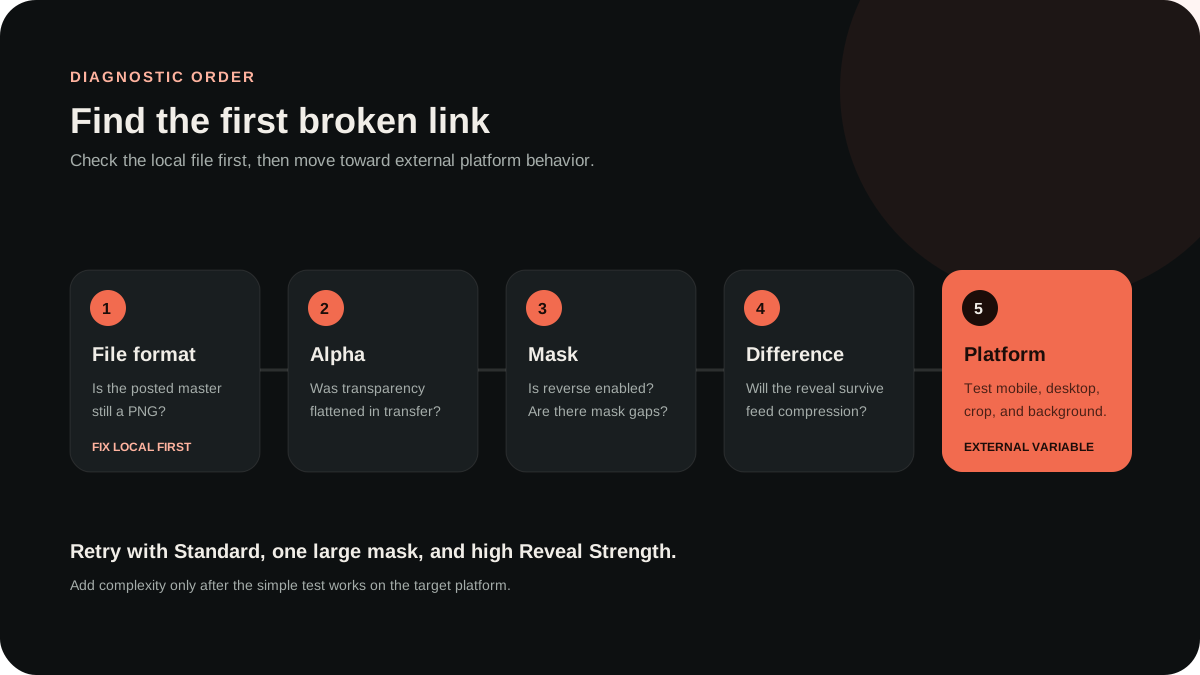
Start with the local file and alpha channel, then inspect the mask and composition before testing external platform behavior.

Tap and hold image FAQ diagnostic flow covering PNG, alpha, mask, visual difference, and platform behavior
Workflow

From upload to transparent PNG

Upload, mask, preview, and export without sending the source image to an image-processing server.

  1. 1Confirm PNG
  2. 2Check alpha and mask
  3. 3Strengthen the visual difference
  4. 4Test the platform result

Start with the controllable file

RevealStudio prepares one transparent PNG in the browser. Keep the downloaded reveal-output.png as the master and avoid any app that converts it to JPG or fills transparent pixels with a solid background. A correct source file is the foundation for every later troubleshooting step.

If the post does not reveal as expected, return to the master instead of repeatedly downloading or editing the version processed by X. The platform copy may have different compression and pixel data.

Use a simple first test

Choose Standard, paint one large meaningful region, use strong Reveal Strength, and export directly. This removes most variables. Once the simple image works, add a softer edge, another template, contrast, saturation, or a more detailed mask.

A controlled test is faster than changing several parameters together. Keep each generated master so you can identify which change improved or weakened the result.

Treat the preview as guidance

The timeline and reveal panels use the same local image state as export, but they do not reproduce X compression, crop, background, device theme, or future rendering changes. They are designed to catch composition and masking problems before upload.

For an important campaign, test the file on the platform and keep a normal static image ready. Essential information should also exist in the post text or destination page.

Get more specific help

Use the step-by-step guide when you are building the first image, the troubleshooting guide when an exported PNG fails, and the template pages when the source is anime art or a product launch. Every help route links back to the same local editor.
FAQ

Common questions

Does RevealStudio upload my original image?+

No. The MVP uses browser Canvas for the source, mask, previews, and PNG export. Anonymous analytics events include only approved fields such as feature type and output size, not image pixels, file names, account details, emails, or user-entered text.

Which source image formats can I upload?+

You can upload JPG, PNG, or WebP files up to 10MB. Very large images are scaled to a browser-friendly working resolution while keeping the aspect ratio. Unsupported files show a clear error before editing begins.

Why does the output need to stay PNG?+

PNG can store an alpha channel for transparent and partly transparent pixels. JPG cannot. Converting reveal-output.png to JPG fills or removes the transparent region and changes the image you prepared.

Why does the result look different after posting to X?+

X can resize, compress, crop, and render transparency against different surfaces on mobile and desktop. RevealStudio previews the controllable local state, but the platform controls the final post. Test a low-risk upload before an important launch.

What should I do if the reveal is too subtle?+

Increase Reveal Strength first. If the states are still similar, use a larger mask, simplify the hidden detail, or increase Contrast. Avoid tiny text, thin lines, and faint gradients that can disappear after feed compression.

What should I do if the timeline preview looks empty?+

Erase part of the mask and keep a recognizable face, silhouette, product category, setup, or other visual anchor. The first state should create curiosity while still looking like an intentional image.

When should I use reverse selection?+

Use reverse selection when the visible subject is smaller than the region you want to hide. Paint the small subject, enable reverse, and the unpainted area receives the transparency change. Check that reverse was not enabled accidentally when a result looks inverted.

Which template should I choose?+

Standard is the safest first test. Anime Reveal supports colorful line art, Glow Reveal emphasizes bright effects, and Dark Reveal suits shadow-heavy sources. Apply a template, then adjust Reveal Strength before changing the other controls.

Can I create and download an image on mobile?+

Yes. The editor supports touch drawing, responsive panels, template controls, preview, generation, and download. Fine edge work is easier on a larger screen, but the full MVP workflow remains available on a mobile browser.

How should I transfer the PNG between devices?+

Transfer it as an original file or document when possible. Messaging and scheduling apps may compress images or flatten alpha. If transparency was lost, return to the original RevealStudio download and upload that master directly.

Create a reveal image in your browser

No account is required. The source image stays on your device while you prepare the transparent PNG.

Open the editor